Catalyst Ex Software Stratasys
How do I use a Stratasys printer with multiple materials? Multiple colors?
Apr 8, 2009 - Layer resolution – height of each layer of material extruded to produce a part. Available resolutions are based on printer type.007 inch (.178. Dimension 3D Printers by Stratasys. Bring your ideas to life with Dimension 3D Printers by Stratasys! Yesterday, you captured your brainstorm in 3D CAD. This morning, it’s a functional 3D model you can hold in your hands, showy our team and test in the field.
How do I add metal inserts in my 3D printed part? This tutorial explains how to use Stratasys software to insert pauses (Z-pause) during an FDM print job, to change materials, colors or to add metal inserts. Go to Step 1 for some documentation and examples of parts printed with Z Pause. • Step 1: What is a Z Pause? Z Pause is a feature in Stratasys FDM printers that automatically pauses the print job at pre-decided layers/slices. There are 2 reasons to pause an FDM print job: to change material/color or to add metal inserts.
Examples of parts printed with multiple colors (all ASA) are shown below. Printing with different materials types is usually not advised since a number of warnings need to be ignored and the print heads could wear faster. Many users also pause prints to place or insert bolts, bearings, and other metal inserts. The print job would then resume on top of the inserts. A great example of 3D printed part with metal inserts:!
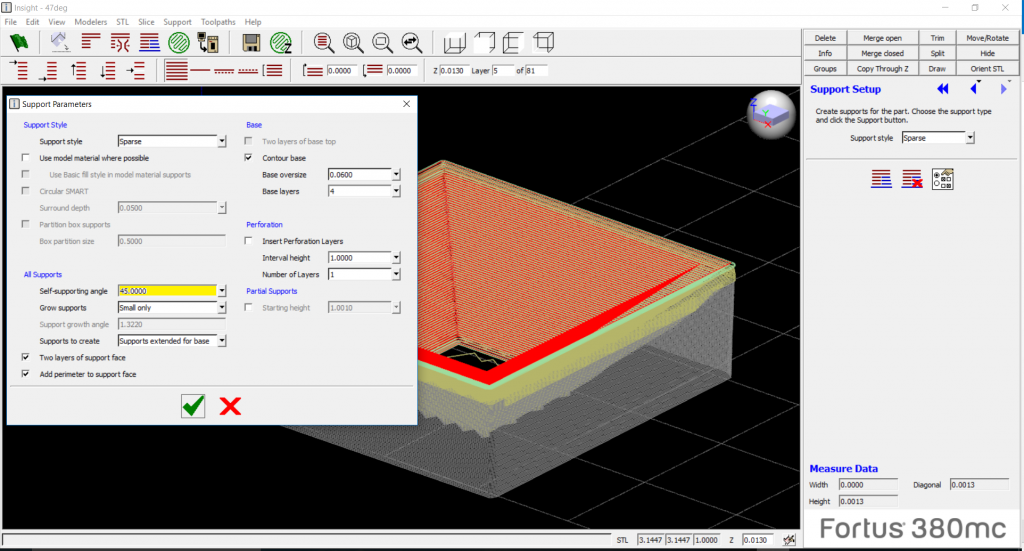
However, this can be tricky and needs pre-processing in Insight to remove support tool-paths in the region of the metal inserts. It is beyond the scope of this tutorial. To download similar files/parts for printing, go to grabcad.com or thingiverse.com. • Step 2: Pick a Stratasys Software This tutorial tells the user how to insert Z pauses in the following Stratasys software: Catalyst (Go to Step 3) - you will need to obtain the installation from Stratasys.
GrabCAD Print (Go to Step 7) Insight (Go to Step 11) For the purpose of this tutorial, I am using the Stratasys F370 printer. This feature can be used in all Dimension, uPrint and Fortus printers. Catalyst only works for Dimension and uPrints, while Insight works for the Fortus printers. GrabCAD Print works for all Stratasys FDM printers.
Makerbot printers can also be paused in a similar fashion. For more information, see and • Step 3: Getting Started With Catalyst Ex For the purpose of this tutorial, I am using version 4.5. After launching, go to File - Open STL. (Catalyst only supports STLs and CMBs). Select Manage 3D printers to add a printer from Network or manually.
This will help prepare the part for these printers. Select the desired properties. Refer to the picture below for the above steps.
• Step 4: Orientation Tab Select the orientation tab as shown below. Then select the 'Process STL' button at the right bottom of the screen above to see the slice data and Layer view panel in the right. • Step 5: Insert Pauses In the layer view settings on the right of the screen, Select the 'Go To' option. This will allow you to select a layer. The 'Step Up' and 'Step Down' allow you to go to the next or previous slices. Select the 'Insert Pause' button at a desired layer.
This will automatically pause the printer at the start of that layer, before any material is deposited. This can be repeated for any number of slices.
The 'Clear All Pauses' removes all the inserted pauses. Once you are done, select the 'All' button to view all the slices. The layers with Z Pauses are shown in white.
• Step 6: Print Your Part Once you have inserted all the desired pauses and are ready for your print, click the 'Add to Pack' and 'Print' buttons at the right bottom of your screen. Catalyst also auto-saves a.cmb archive to your disk. Crossword forge 7 3 keygenguru 1. You can also send this file elsewhere to be printed. All the Z pause related information is contained in the CMB file. • Step 7: Download and Install GrabCAD Print To download GrabCAD Print, go to. Click the download button and complete the installation process. Once complete, launch GrabCAD Print.

• Step 8: Getting Started With GrabCAD Print If you haven't used GrabCAD Print before, once GrabCAD Print is launched, select the Printer list panel at the right bottom of the screen. Here, click 'Add a Printer'. This allows you to add your desired printer (a network printer or a template printer). Once the printer is selected, add a CAD model by clicking the 'Add Models' button in the left panel.